I can pretty much resist all types of temptations. I am not the type of person who will open a packet of biscuits and 15 minutes later find that the whole thing has been completely demolished. However when it comes to anything oaty, its a completely different story all together. When I am faced with a golden, chewy, flapjack, a comforting bowl of porrdige or even a great oatcake topped with a chunk of mature chedar cheese, my will power just seems to go out of the window. However, what always makes me feel slightly better after I have devoured half a tray of freshly baked flapjacks is the nutritional benefits to eating these lovely little, pearly oats.
As we all know oats are a great source of slow releasing energy. They also recieve pretty good press in terms of their cholesterol lowering properties and also help reduce the chance of heart disease, which lets be honest at my age is not something I tend to think about, but nevertheless we all know that oats are good for us. So I would say, get in that kitchen, get out a bowl,a wooden spoon and put some music on and make these delicious biscuits.
Oat and Raisin Cookies
225g softened butter
150g granulated sugar
200g light brown sugar
2 eggs
245g plain flour
2 tsp baking powder
1 tsp salt
1 tsp cinnamon
175g oats
240g raisins
(optional: few handful of white chocolate chips)
1) Beat the butter together with the sugars, till light and creamy.
2) Mix the flour, salt, cinnamon, baking powder, oats and raisins.
3) Add the eggs one at a time to the creamed butter and sugar.
4) Gradually add the flour and oat mixture(along with the white chocolate)to the butter and mix till everything comes together.
5) Chill the batter for a few hours.
6) Place 50g balls of the batter onto a greased baking tray and then flatten the biscuits a little with a fork, the back of a spoon or just with your hands. Bake for 20 minutes or until the just begin to turn a bit brown at the edges, at 180C.
Friday, 22 October 2010
Wednesday, 15 September 2010
Cupcake Week

For all those who love cupcakes, this week is a very exciting one. It's National Cupcake Week, an event organised by the British Baker magazine to honour our love for these little treats. This means we finally have a valid excuse to bake some yummy cupcakes. So go ahead, set aside half an hour and make yourselves a batch of these delicious cupcakes.
Cupcakes:
150g sugar
150g butter
150g self raising flour
3 eggs
1/2 tsp baking powder
100ml milk
1 tsp vanilla extract or grated zest of a lemon
1)Beat the sugar and butter together till light and fluffy
2)Gradually beat in the eggs, one by one
3)Fold in the flour and baking powder along with the vanilla or lemon zest.
4)Fill the cupcake cases just over 3/4 full and bake at 180C for 20-25 mins
Butter Icing:
50g butter
200g icing sugar
2 tbsp milk
Melt the butter and mix with the icing sugar until fluffy and light, then stir in the milk. At this point you can add any food colouring that you want, my colour of choice is usually pink.
Now sit back and enjoy the joy that is this amazing week

Tuesday, 17 August 2010
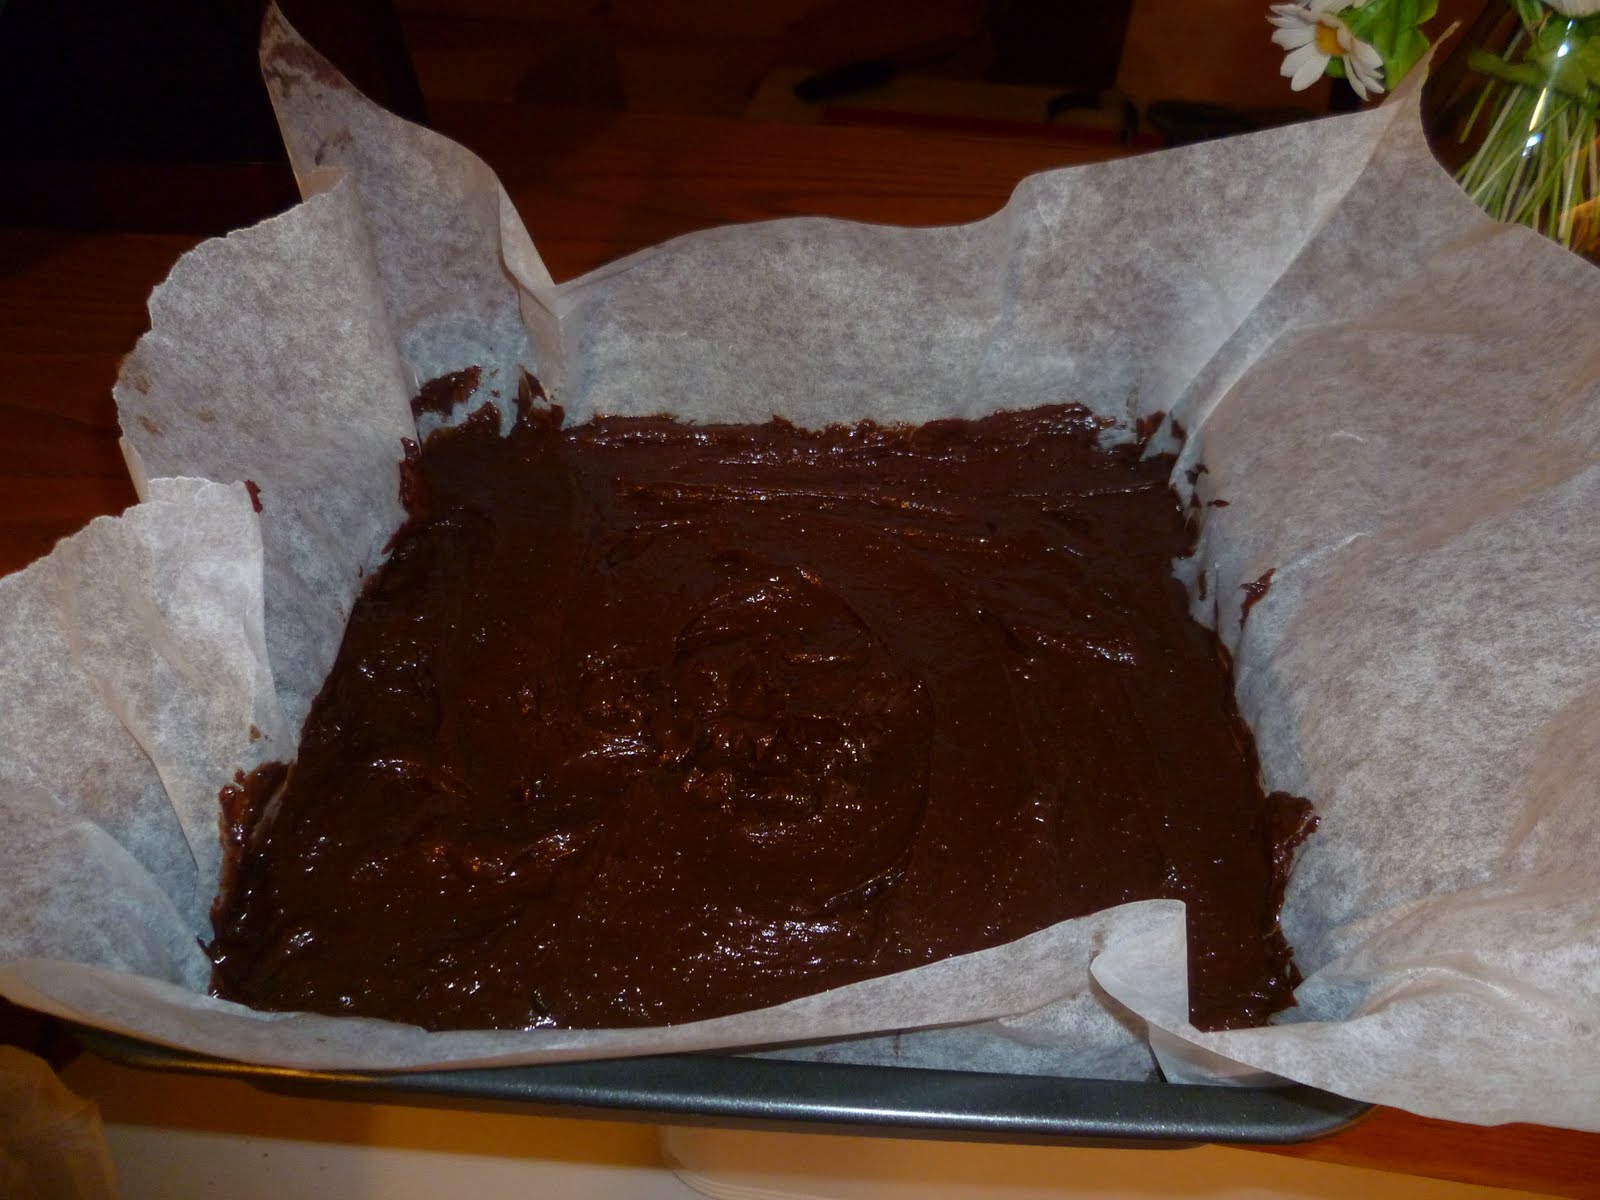
Brownies
Now there are a couple of recipes I have which as my close friends will know, I never part with. .
. . But I've decided to not be so selfish and to share one of my favourite recipes with you: the ultimate brownie recipe.
 .
. . But I've decided to not be so selfish and to share one of my favourite recipes with you: the ultimate brownie recipe.
 Most of my recipes are adaptations of others’, such as the flapjack recipe I use which I have adapted from James Martins’ Chocolate and Ginger Flapjacks. The brownie recipe I rely on, but to which I have made a few tweaks to, is Nigel Slater’s. I find that after years of painfully searching for a good brownie recipe that is rich but not too sickly, this one is, as I said mentioned earlier, The Ultimate Brownie recipe!
Brownies
250g dark chocolate
300g sugar
3 eggs
250g butter
1 tsp baking powder
1 tsp vanilla extract
60g flour
60g cocoa
Pinch of salt
1) Melt 200g of the chocolate and set it aside to cool
2) Beat the sugar and softened butter together until pale and fluffy.
3) Gradually beat in the eggs one by one (if the mixture starts to curdle add 1 tbsp of flour)
4) Fold in the melted chocolate and vanilla and cut up the remaining 50g into gravel sized chunks and fold
that in as well.
5) Lastly sift in the cocoa, flour and baking powder and fold in gently.
6) Pour into a square 23 x 23 cm tin and bake for 35 mins (or until the top has formed a thin crust) at 180C/ fan
160C.
These are best served immediately, if you want them as a dessert, with a melting ball of vanilla ice cream and a rich chocolate sauce made with equal amounts of dark chocolate and cream melted together in the microwave. Or they are best made the day before if to be eaten as a snack or packed in a lunchbox as they tend to keep their shape better when they are a day old.
Saturday, 31 July 2010
A evening in Athens
 Everytime I come back from university I fall in love with Athens all over again. You can get lost in all the nooks and crannies of Thisseio, Plaka, Psiri and never come across the same shop, the same art mural, the same cafeteria, there are just endless things to see and do. You can listen to the various buskers playing a jazzy, upbeat song or admire the Acropolis while nibbling on some nuts, bought from an old Greek man off the side of the street.
One thing I love about Greece is the culture of going out for a coffee and sitting there, chatting for hours on end. Greeks love their coffee and especially during the summer, they love their ice-cold frappe. You can go out any time of the day and you will struggle to find a place to sit down and have a drink. It's always at this time that I wonder "don't these people have jobs?", no wonder Greece is feeling the burn of the
 economic crisis. Walking down the pedestrianized pathway that leads you from the Acropolis area down to Thisseio, the road is paved with cafeterias. Row after row, table after table, cafe after cafe. For a second I was taken aback with the abundance of these coffe shops,
  but then it hit me, this is what we Greeks do, this is what we are famous for: sitting and lazing around, drinking endless amounts of coffee without a care in the world of what one should really be doing or what time of day it is. But that's what I love about the Greek νοωτροπία (way of thinking), they live a casual, carefree life. Especially in the summer, we wake up late, feast on lovely fresh melon and peaches all day, lounge by the sea and then decide to head off for dinner around 10 in the evening. What a life, eh?
Friday, 30 July 2010
Chocolate
 If there is one thing I can't live without it's chocolate.
I have great will power but I struggle to go three days without a tiny hit of cocoa from a shop bought chocolate bar. To hell with all this fancy pants Swiss or French chocolate, I tend to like all dark chocolate. I hate to admit, all foodies should look away now, but I have to say that Somerfields' own brand, dark chocolate is great. At 40 pence a bar (yes, 40 p a bar!) you get all the great taste of rich cocoa and the great crisp sound when you break off a piece( or five) without the bitterness and without the horrible grainyness you get from other cheap chocolates. I even like Cadbury's Bournville dark chocolate and ASDA's own brand-dark chocolate. Maybe my preference for cheap chocolate comes with being a student, but I have tried many chocolates, from Gold & Blacks to Fair Trade and I will always go back to Bournville or good old Sommerfields.
However I will never turn down a bar of "good quality dark chocolate" . When I'm at uni and I want to have a square of chocolate after dinner I go for the cheap stuff . But when I bake with it and make brownies or chocolate chip cookies, I will definetly use a better quality chocolate, or whatever I can find in Asda that is a bit more expensive than 40p bar.
Saturday, 13 March 2010
Apple Crumble Cake

Seeing as apples are at their best in February there is still an abundances of this great fruit around. Take advantage of this time and bake this amazing apple cake. Indeed this recipe is amazing, but the crumble topping does just take it from being a dull apple cake to a an absolutely delicious dessert.
Apple Crumble Cake
175g unsalted butter
150g sugar
4 apples (peeled, cored and sliced into thin wedges)
3 eggs
200g plain flour
2 tsp baking powder
150g creme fraiche ( I used reduced fat ; plain Greek (Total) yogurt could also be used)
zest of a lemon
1/2 tsp cinnamon
4 tbsp honey or maple syrup
zest of a lemon
1/2 tsp cinnamon
4 tbsp honey or maple syrup
For the crumble topping:
80g almonds, finely chopped (can use hazelnuts or walnuts)
50g butter
50g brown sugar
1 tsp cinnamon
75g plain flour
1)Butter and line a 20/23 cm round tin.
2)For the crumble topping: melt the butter and mix in the brown sugar, cinnamon, flour and chopped nuts.
3) In a pan heat 25g of butter with 1tbsp of sugar and add the apple wedges. Cook these for about 10-15 minutes until they are tender and turn a lovely golden colour.
4) For the cake: cream the remaining butter and sugar until light and fluffy. Then add the eggs one at a time( if the mixture looks like it may curdle, simply add 1tbsp of flour to the mixture).
5) Fold the flour, lemon zest, cinnamon and baking powder to the butter mixture. 6) Add the creme fraiche and mix together till you have a smooth batter.
7) Spoon about 2/3 of the cake mixture into the tin and spread it level, then sprinkle over about 1/3 of the crumble mix.
8) Pour in the remaining cake batter and top with a light layer of the crumble mix. Top this off with the apple slices, arranged neatly, and finally scatter the remaining crumble mixture over the top. If you want you could sprinkle over an extra tablespoon or two of almonds, to give the cake extra crunch.
9) Bake at 180C/ gas 4 for an hour and a half. If the cake seems to be getting brown too quickly, simply cover the top with a sheet of aluminium foil or baking parchment.
10) Once the cake has cooled for 10 minutes, heat the honey or maple syrup and drizzle over the top.

Sunday, 21 February 2010
Mincemeat and Marzipan Cake
 It always seems that after Christmas, no matter how many mince pies you make there is always a little bit of mincemeat left over. So here is an amazing cake recipe that will help you get rid of that half filled jar of mincemeat that's sitting at the back of your fridge. I am not necessarily a great fan of mincemeat or marzipan but this cake doesn't particularly taste strongly of either ingredients. They just simply give this loaf cake a lovely moist texture.
Mincemeat and Marzipan Cake
- 200g self raising flour
- 100g cold butter, cut into little pieces
- 85g light brown sugar
- 85g marzipan, cut into little 1 cm cubed pieces
- 2 eggs
- 2 tbsp flaked almonds
- 300g mincemeat
Tin: 1kg/2lb loaf tin - greased and lined
1) Tip the flour into a bowl, add the cold butter and rub together until the mixture resembles bread crumbs. Alternatively you can blitz them together in the food processor.
2) Stir the sugar and marzipan into the flour mixture.
3) In another bowl, whisk the eggs and then stir in the mincemeat. Then stir this into the flour mixture until everything is evenly combined.
4) Spoon the mixture into the greased loaf tin and sprinkle the almonds on top.
5) Bake at 180C for 1 hour or until the cake has risen and has turned a lovely golden brown.
6) Allow to cool before you take it out of its tin.
Enjoy a slice of this moist cake as a snack, with a nice cup of tea.
Wednesday, 17 February 2010
Pancake Galore
I know it's a bit late to be posting a recipe about pancakes seeing as it was Shrove Tuesday yesterday. But I'm sure that after yesterday we have all realised that we need to be making them more often. So here is a recipe for those light and fluffy American style pancakes.
American Pancakes
-2 cups plain flour
-2 1/2 cups buttermilk ( or simply use 1 part Greek yogurt to 1 part milk, to make up the required amount)
- 2 eggs
- 1 tsp baking powder
- pinch of salt
- 1 tsp vanilla essence (optional)
1) Sieve all the dry ingredients together into a large bowl.
2) Separate the eggs, mix the egg yolks with the buttermilk and vanilla.
3) Whisk the egg whites with a pinch of salt.
4) Mix the wet ingredients with the flour mixture.
5) Lastly fold the egg whites into the batter.
6) Heat a frying pan and grease with a little oil or butter. These are American pancakes so you only want to pour in enough batter to make a small circle. Cook for 1-2 minutes until the mixture begins to set and bubble slightly. Then flip over and leave to cook for another minute.
If the pancake batter is a bit too thick and is cooking a lot faster on the bottom side than on top, just thin the mixture out by adding a bit more milk until you are happy with the consistency.
As awful as it sounds I like to enjoy these pancakes with chocolate spread and golden syrup, (together), delicious!
Monday, 15 February 2010
Clean Monday - Καθαρή Δευτέρα

Today in Greece, we celebrate what is called Καθαρή Δευτέρα (pronouned kathari deftera). Also known as Clean Monday and Ash Monday, it marks the first day of the Christian Orthodox lent. This traditional day is a bank holiday in Greece and so families are able to gather together and feast upon a great meat-free meal.
Only on this day of the year a special type of bread is baked and sold by the vast number of bakeries in Greece. It is called 'lagana', and is simply a large loaf of bread which contains no yeast and so is very thin and has sesame seeds sprinkled over the top. Every year my dad and I would go to the bakery early in the morning and get 10 of these. They would be piled up in large baskets, and you could ask for softer ones or ones which had been baked for longer and so were a lot crispier.
 They would then wrap them in paper and place them in a bag for you. Without fail, on the way home my dad and I would always break off a few chunks of the warm, crusty bread to nibble on till we got home.
Another tradition which children and adults of all ages engage in on this day is kite flying. People set out little stalls all along the streets and pavements and sell kites of all different colours and patterns. You begin to see kites in the sky from about miday and as it gets later you can count hundreds of them.
The food menu on this holy day is endless. My grandmother (and all other women of the family) spend days preparing for this glorious feast. The dishes you typically see served on this day include:
-taramosalata - a dip made from fish roe
-φάβα (fava) - a dip made from split peas

-γίγαντες - broad beans with a tomato sauce baked in the oven
- fish
- squid and octopus
all obviously accompanied by the lagana bread.
Then usually for desert there are a number of things to choose from, as in the Greek culuture if you are visiting someone you will always take something with you. So on this day all the guests tend to bring a desert they have bought from one of the hundreds of pastry shops (zaharoplastia-ζαχαροπλαστία) dotted around.
However the traditional desert for this day is χαλβά, halva. This is a sweet, dense confection. There are two types, the most common one is made from tahini (sesame paste) whereas as the other (χαλβά φαρσάλων) is slightly more gelatinous and is made from semolina and flour. Other
 ingredients are added such as pistachios or almonds. The most common type comes in different flavours as well, you can get plain, vanilla or chocolate or a mix. My personal favourite is the vanilla halva with almonds.
Over all this is a great day for everyone. Friends and families come together and celebrate the start of lent with a great meal along with a great atmosphere.
Thursday, 11 February 2010
Cream Tea
 Last weekend a couple of my closest friends and I met up and spent a lovely weekend together at my friend's apartment in Earls Court. We woke up on Saturday morning and thought it would be a great idea to walk to the Kensington Palace Gardens. We had a 'hearty' breakfast of cereal and set off for the day.
The weather wasn't great but every now and then we did get a few lovely, golden rays of sun warming our cold skin. The grounds of the palace were amazing, all lush and green. With people out for their morning jog and families walking their dogs and pushing their babies around in their prams.
We had been walking around for a couple of hours when we decided we had had enough of the cold and decided to find somewhere for a drink. One of my friends had mentioned earlier that there was a tea room somewhere on the grounds, so we headed there.
We reached our destination and were guided through the tea room to a table for four. The tea room was amazing. All pristine and white inside. Each table had a little plant pot in the centre which appeared to be a mini orange tree, wisely chosen after the name of the tea room, 'The Orangery'. As the hostess guided us to our table we passed the centre piece of the room. An array of cakes and scones were neatly presented on a large table. There was a carrot cake, coffee and walnut cake, a lemon loaf cake, fruit scones, cheese scones, an Orangery cake, a tart of some sort and a selection of cupcakes. They all looked mouth-wateringly good.
We all decided to treat ourselves and go the whole hog; a scone with clotted cream and strawberry jam, one of my friends was the exception and ordered a piece of carrot cake (but later ate half of my scone as well). The scones were light and fluffy, and tasted absolutely divine with the rich, velvety cream and ruby red jam. Simply amazing!
I would suggest anyone go there if they are out in London and want to treat them selves to a little guilty pleasure.
Monday, 8 February 2010
I have realised that in blog entry that I put up about the Apple pie, there was a bit too much going on in the recipe instructions and found that there's too much unnecessary information . So in order to make this recipe easier to follow I have simplified it down for you.
Apple Pie
For the pastry:
425g
1/2 tsp salt
100g sugar
250g unsalted butter
1 egg
2 yolk
For the filling:
100g sultanas
1/2 an orange, juice only
1 tbsp of semolina
8 large apples
100g sugar
4 tbsp cinammon
1 egg
Dish: a high sided 20 cm spring form cake tin or a 23 cm shallow pie dish
1) Place the sultanas into a bowl with the orange juice to let them soak.
2)To make the pastry:
place all the pastry ingredients (apart from the eggs) into a food processor and blend until the mixture resembles breadcrumbs.
3) Gradually add the egg and egg yolks and blend well until it comes together to form a ball. Take the pastry out and wrap with cling film. Place in the fridge for 30 minutes.
4) Grease your tin and roll out 2/3 of the pastry on a floured surface into a rough circle. Carefully lift up your pastry and place it into the greased tin . Gently press the pastry into all the corners of the tin, or all the dips of the pie dish.
5) Prick the base a few times with a fork.
6) Place a large sheet of baking paper over the pastry and fill it with baking beans or just use any rice or dried beans you have lying around.
7) Bake the pastry at 180C for about 15 minutes and then remove it from the oven, take out the beans and baking paper and place back into the oven for a further 5 minutes. Once it's ready take it out and leave it to cool.
8) For the filling:
you want to peel, core and finely slice the apples. In a separate bowl mix the sugar and the cinammon together. Before you start placing all the remaining ingredients into the dish lightly sprinkle the semolina flour over the bottom of the pastry.
9) Place a layer of the apples onto the base of the pastry case and then sprinkle over some of the cinammony sugar mixture and scatter a few of the soaked sultanas over as well. You want to repeat this layering process until you fill the dish. If you have any sugar or sultanas remaining just sprinkle them over the top of all the layers.
10) Beat the egg and brush some onto the rim of the pastry case, this will make sure the pastry lid sticks to the rest of the pastry.
11) Roll out the remaining pastry into a circle and place on top of the pie. To seal the lid, simply take a fork and crimp the edges. If you find that there is a lot of excess pastry hanging over the side of the dish simply cut of the excess pieces.
12) With a knife make a small hole in the centre of the lid to allow any steam to escape. Then brush the lid with the remaining beaten egg.
13) Bake at 170C for 35-40 minutes until golden brown.
Serve with warm or cold, accompanied by ice cream, warm custard or cream.
Apple Pie
For the pastry:

425g
1/2 tsp salt
100g sugar
250g unsalted butter
1 egg
2 yolk
For the filling:
100g sultanas
1/2 an orange, juice only
1 tbsp of semolina
8 large apples
100g sugar
4 tbsp cinammon
1 egg
Dish: a high sided 20 cm spring form cake tin or a 23 cm shallow pie dish
1) Place the sultanas into a bowl with the orange juice to let them soak.
2)To make the pastry:
place all the pastry ingredients (apart from the eggs) into a food processor and blend until the mixture resembles breadcrumbs.
3) Gradually add the egg and egg yolks and blend well until it comes together to form a ball. Take the pastry out and wrap with cling film. Place in the fridge for 30 minutes.
4) Grease your tin and roll out 2/3 of the pastry on a floured surface into a rough circle. Carefully lift up your pastry and place it into the greased tin . Gently press the pastry into all the corners of the tin, or all the dips of the pie dish.
5) Prick the base a few times with a fork.
6) Place a large sheet of baking paper over the pastry and fill it with baking beans or just use any rice or dried beans you have lying around.
7) Bake the pastry at 180C for about 15 minutes and then remove it from the oven, take out the beans and baking paper and place back into the oven for a further 5 minutes. Once it's ready take it out and leave it to cool.
8) For the filling:
you want to peel, core and finely slice the apples. In a separate bowl mix the sugar and the cinammon together. Before you start placing all the remaining ingredients into the dish lightly sprinkle the semolina flour over the bottom of the pastry.
9) Place a layer of the apples onto the base of the pastry case and then sprinkle over some of the cinammony sugar mixture and scatter a few of the soaked sultanas over as well. You want to repeat this layering process until you fill the dish. If you have any sugar or sultanas remaining just sprinkle them over the top of all the layers.
10) Beat the egg and brush some onto the rim of the pastry case, this will make sure the pastry lid sticks to the rest of the pastry.
11) Roll out the remaining pastry into a circle and place on top of the pie. To seal the lid, simply take a fork and crimp the edges. If you find that there is a lot of excess pastry hanging over the side of the dish simply cut of the excess pieces.
12) With a knife make a small hole in the centre of the lid to allow any steam to escape. Then brush the lid with the remaining beaten egg.
13) Bake at 170C for 35-40 minutes until golden brown.
Serve with warm or cold, accompanied by ice cream, warm custard or cream.
Sunday, 7 February 2010
Gingerbread House
 In an earlier blog, I had mentioned that I was going to build a Gingerbread House for Christmas. It took me two gruelling days during the holidays but I managed to pull through and construct an amazing 'humble' abode.
I had made one for Christmas 2008, but this time I was aiming even higher. I wanted a bigger, better and brighter house! So I made a much larger template for the walls and roof, used way more sweets, and for the 'cement' (keeping all the walls together) I used a concoction of egg white and icing sugar instead of your normal icing sugar and water mix.
Off course it wouldn't have been right if something didn't
 manage to go wrong. It begin as I was trying to patiently stick the walls and roof together. I had to pipe some of the 'cement' onto one wall at a time but found that I could use glass tumblers to keep the walls upright until they dried. So after doing this four times and using 8 large glasses( one on each side of the walls), I moved on to tackle the roof. Half an hour later, I had managed to stick the 2 remaining slabs of gingerbread biscuit onto the top, leading to the completion of the foundations of my house.
As I sank into the kitchen chair, admiring my house, I moved the board it had been assembled on to see what it looked like from all angles. "This seems really heavy" I thought, I suddenly looked
 through the space of the little door and could see something reflecting back at me. I realised that I had forgotten about the support system. I had stupidly managed to 'brick' in 4 large and heavy glasses!
I had come too far to give up now (after spending about 6 hours, making the dough, rolling it out, baking the biscuits and assembling all the pieces). I simply had to remove the roof and get the glasses out of my house and then just glue it back together, and that's what I did. Finally I was able to sit down and relax thinking
 that tomorrow my artistic skills would be put to test as I decorated the outside of the house.
I can proudly say that this year's house was better than last year's, and although it was sad to have to demolish it ( on the day that I left home to go back to England) the joy of eating the walls and roof made it all worth it!
Thursday, 4 February 2010
Sweet as Apple Pie
 I have always wanted to make a apple pie simply because it would just be wonderful to open the oven and have that warm smell of cinammon and apples waft out into the kitchen. I think another reason why for ages I have wanted to make this pie is because I vividly remember watching the scene in Snow White and the Seven Dwarfs where Snow White is making one herself and the birds come along and help her crimp the edges by stepping on them with their tiny feet.
So last year, it was the end of the summer and I noticed we had a couple of these particular apples lying about which none of us really liked. I'm always trying to be resourceful with what I bake and try to use up ingredients that are just lying about untouched. So this was a great opportunity to make my apple pie.
I went through about a thousand recipes before I selected a particular one. When I begin looking for a recipe I usually know what I want out of it, for example in this case I didn't want anything fancy, just a simple shortcrust pastry, apples and a few spices. I also wanted an apple pie that would keep its shape and wouldn't have to be served from its dish, I wanted to be able to present it nicely on a plate out of its baking tray.
So I chose the following recipe and added a few tweaks of my own.
Apple Pie
For the pastry:
425g
1/2 tsp salt
100g sugar
250g unsalted butter
1 egg
2 yolk
For the filling:
100g sultanas
1/2 an orange, juice only
1 tbsp of semolina
8 large apples
100g sugar
4 tbsp cinammon
1 egg
The original recipe called for a high sided 20 cm spring form cake tine, but I used a 23 cm shallow pie dish and it worked out fine for me, so you can use whatever you have.
1) Begin by placing the sultanas into a bowl with the orange juice to let them soak, this should give them enough time to absorb some of the liquid to swell and plump up.
2)To make the pastry place all the pastry ingredients (apart from the eggs) into a food processor and blend until the mixture resembles breadcrumbs.
3) Gradually add the egg and egg yolks to the mixture and blend well until it comes together to form a ball. Take the pastry out and bring it together with your hands. Then wrap with cling film and place in the fridge for 30 minutes.
(When recipes call for placing pastry or dough into the fridge I sometimes place it into the freezer just because I feel that the freezer will do what the fridge would for the pastry but in half the time. I don't really know if that's the right thing to do but it always seems to work for me)
4) Grease your tin and roll out 2/3 of the pastry on a floured surface ( making sure to use enough flour to prevent the pastry from sticking) into a rough circle. Then carefully lift up your pastry and place it into the greased tin (don't worry if the pastry falls apart slightly all you need to do is a bit of patchwork and just try and press the little pieces together). Gently press the pastry into all the corners of the tin, or all the dips of the pie dish.
5) Once the pastry is nicely lining the tin prick the base a few times with a fork.
6) Place a large sheet of baking paper over the pastry and fill it with baking beans or if you don't have any, use any rice or dried beans you have lying around (this process is called 'blind baking' the pastry).
7) Bake the pastry at 180C for about 15 minutes and then remove it from the oven, take out the beans and baking paper and place back into the oven for a further 5 minutes. Don't worry you will be able to tell if it's cooked or not as it will be dark in patches if still not perfectly cooked through. If it's still not completely cooked just place it back in the oven for a few more minutes, keeping an eye on it. Once it's ready take it out and leave it to cool.
8) For the filling, you want to peel core and finely slice the apples and in a separate bowl mix the sugar and the cinammon together. Before you start placing all the remaining ingredients into the dish lightly sprinkle the semolina flour over the bottom of the pastry to ensure that any juices from the apples don't' make the pastry soggy.
9) Place a layer of the apples onto the base of the pastry case and then sprinkle over some of the cinammony sugar mixture and scatter a few of the soaked sultanas over as well. You want to repeat this layering process until you fill the dish. If you have any sugar or sultanas remaining just sprinkle them over the top of all the layers.
10) Beat the egg and brush some onto the rim of the pastry case, this will make sure the pastry lid sticks to the rest of the pastry.
11) Roll out the remaining pastry into a circle and place on top of the pie. To seal the lid, simple take a fork ( or if there are any kind birds around to do it for you) and crimp the edges. If you find that there is a lot of excess pastry hanging over the side of the dish simply cut of the excess pieces using some scissors or a knife.
12) With a knife make a small hole (about the diameter of your thumb) in the centre of the lid to allow any steam to escape. Then brush the lid with the remaining beaten egg.
13) Bake at 170C for 35-40 minutes until golden brown.
The best way to serve this in my opinion is with some good vanilla ice cream, but I know that most people's topping of choice would be custard or even clotted cream. You can serve it hot, immediately from the over, but I personally preferred it when it had completely cooled.
Enjoy!
Wednesday, 3 February 2010
Greek honey biscuits - Melomakarona
 Melomakarona are a Greek sort of biscuit which are traditionally made for the Christmas period. They are typically made with flour, olive oil, semolina, sugar, brandy and then with spices such as cinammon, cloves and oranges.
Every year the women of the family set out to make these biscuits and then in typical Greek fashion offer them to visitors. So every Christmas we would go around visiting neighbours and relatives and end up coming home with plates and boxes full of them. However, everyone's recipe is slightly different. Some add more spices and others add less and some may even add walnuts to the biscuit mixture. Which means that every family pretty much has their own unique recipe for these amazing biscuits.

For the Christmas period there are three traditional types of sweets that they make in Greece. These are the melomakarona, kourabiedes and diples. Kourabiedes are crescent shaped biscuits which are made with rose water, ground almonds, sugar and butter and are topped off with heavy mounds of icing sugar. If I were to compare them to any other biscuit I would say that they are most similar to the english shortbread or butter biscuits, in the sense that they delicately melt in your mouth. Diples are deep fried strips of a specific type of pastry which are then topped off with drizzles of honey or a sugar syrup and then sprinkled with crushed walnuts.
 My grandmother has always made diples and kourabiedes however my sweet of choice during the christmas period are these melomakarona. So after many years of eating these honey biscuits given to us by neighbours and friends, or given to us as presents, bought from one of the many sweet shops (or as they are called in greece, zacharoplastia) that make thousands upon thousands of these over the seasonal holiday. We decided, a couple of years ago that we would find a recipe and make our own.
On searching through my grandmother's recipe books we found several recipes for the biscuits but decided to settle on one which was labelled 'Anna's Melomakarona' (Anna being an old relative of ours). The recipe called for vegetable oil, fine semolina, sugar, zest and juice of a couple of oranges, cinammon, cloves and brandy. The ingredient list also included ashes, which were commonly
 used in many greek recipes in the past however we decided to omit this specific ingredient. Once the biscuits have baked in the oven you then immediatly place them into a deep dish and using a ladel, pour over a honey sugar syrup that has been boiling away as the biscuits were cooking. The biscuits are then left, to seep, in the syrup for a couple of minutes and then turned over on the other side in order for the syrup to reach the top of the biscuits as well.
After they have turned a wonderful golden brown colour they are taken out of the dish and placed onto a tray where they are then sprinkled with a mixture of crushed walnuts and cinammon, just enough of the spice to give it a wonderful smell.
These honey biscuits are my absolute favourites during Christmas and sadly they are not made during any other time of the year. But that's why they're so special when you do actually have them, as you have been waiting for a whole year to be able to enjoy them.

Monday, 25 January 2010
New Year...New Entries

I feel I may have let you, the few people that read my blog, down. Although I had set out to be dedicated to this blog, I have realised that it is very hard balancing my time between university work and my free time.
I have been incredibly busy these last few weeks with revising for exams and all. However, today I finished my last exam which means I can begin writing more for this blog.
In the last 3 weeks I have not been able to cook myself a proper, decent meal and instead I have been living off tinned tuna fish and omelettes. So, my first blog entry of 2010 will be about an amazing chutney recipe that my dad and I came across during the Christmas holidays. We were trying to find a way we could use up some dried figs, which were from figs collected in August off our own fig tree. They seemed to be a lot less popular than we had expected and so were trying to find a way to, simply put, get rid of them.
While searching our recipe books and looking through recipe websites, we found that there are not that many recipes that ask for dried figs. However we suddenly came across a chutney recipe which although its main ingredient was apples, it did actually include dried figs in its ingredients list.
We had never made a chutney before, marmalades, yes! but not chutnies! So we set out quite apprehensivly: chopped up all the ingredients, boiled them up with some sugar, and were extremely pleasantly suprised with the results! This chuntey recipe was both simple and easy to follow, even for chutney virgins like us. The sultanas and dried figs gave it an amazing amber colour but also gave it a lovely texture. It was not as smooth and baby-food like as other chutneys, but rather had oompf and a zinginess to it. The cayenne pepper also gave it warmth and heat. Overall this chutney was absolutly amazing and we found that it worked best with cheeses rather than cold meats. I, as well as other members of our family who tried the chutney on Christmas day, loved it so much that we made another batch of it in the last few days of the holidays. We gave one large jar to my grandmother, my parents kept another jar and I brought a small jar back to university with me. I have been greedily getting through it, by topping off a piece of cheddar cheese on an oat cracker with a spoonful of this amazing chutney.
Apple, Dried Fig and Apricot Chutney

5 apples
3/4 cup dried apricots
3/4 cup dried figs
1/2 cup raisins
4 cloves of garlic
2 by 1 inch cube of ginger
1 3/4 cup of sugar
1 1/2 white vinegar
2 tsp salt
1 tsp cayenne pepper
1) Peel, core and chop the apples into small pieces, depending on how fine or chunky you want your chutney. Chop the dried figs and apricots into pieces as large as thoughs of the apples and add them along with the raisins, to a medium sized pan.
2) Mince the garlic, grate the ginger and add them to the pan.
3) Then add the vinegar, sugar, salt and cayenne pepper and give the mixture a good stir.
4) Bring the mixture to a boil and then turn the heat down to medium-low heat for about 40 minutes, until it reaches a thick consistency similar to jam.
5) Stir the mixture every now and then, to make sure it doesn't stick to the bottom of the pan.
6) Once it's ready, let it cool completely in the pan before pouring into jars.
This recipe should get you about 3 small jars.
Subscribe to:
Posts (Atom)